W9 从建模到仿真:URDF到Moveit
模型转为 URDF
什么是 URDF?
URDF(Unified Robot Description Format)是一种用于描述机器人模型的 XML 格式。它是一种开放的标准,由 Wikipedia 维护。
URDF 文件包含机器人模型的详细信息,包括:机器人名称、机器人链接、关节、传感器等等。
准备工作
先确定小车有哪些需要活动的部件,给它们增加上转轴、坐标系。如果不用添加,后续插件也可以自动生成,但可能和你设想的有偏差,例如仿真时可能会翻倒、转轴不正确等等。具体操作见视频。
如何将模型转为 URDF?
- 给你的 SolidWorks 安装能将模型导出为 URDF 文件的插件。 Wiki地址 里面包含了教程。
- 打开小车模型,上方
工具菜单,向下滚动Tools,点击Export as URDF。 - 第一栏:取个名字,一般 base_link;第三栏:选择 link 实体;第四栏:确定相连接的实体数目,每增加一个,下方会给基座增添一个子 link。
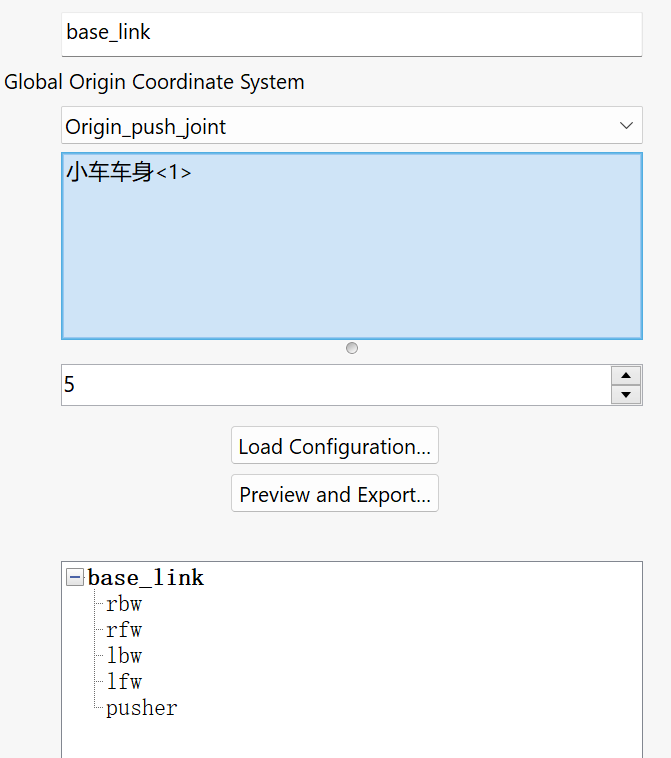
- 可以双击下面的子 link,配置子 link 的属性。第一栏:joint 名称;第二栏:参考坐标系;第三栏:参考轴;第四栏:joint 类型,
continuous是连续旋转,fixed是固定,revolute是限位旋转;第五栏:选择 link 实体;第六栏:子 link 数量(同上)。下方按钮一:导入已有的配置;下方按钮二:预览与导出配置。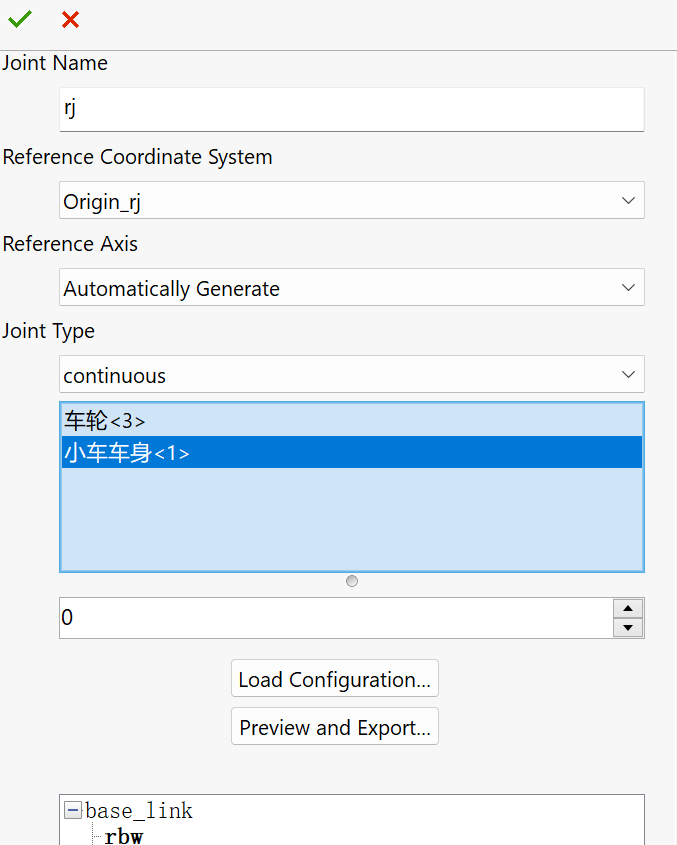
- 完成所有 link 的配置。
- 点击
Preview and Export...,预览导出配置。 - 进一步配置 joint 属性,主要是给
revolute类型配置旋转上下限,数值单位为 rad,例如 +3.14 约为 +180°,它是相对你当前显示位置来算的,注意upper必须比lower大,velocity必须表示不能是整数(后续仿真会出错,可以用例如 2.01 这样的小数)。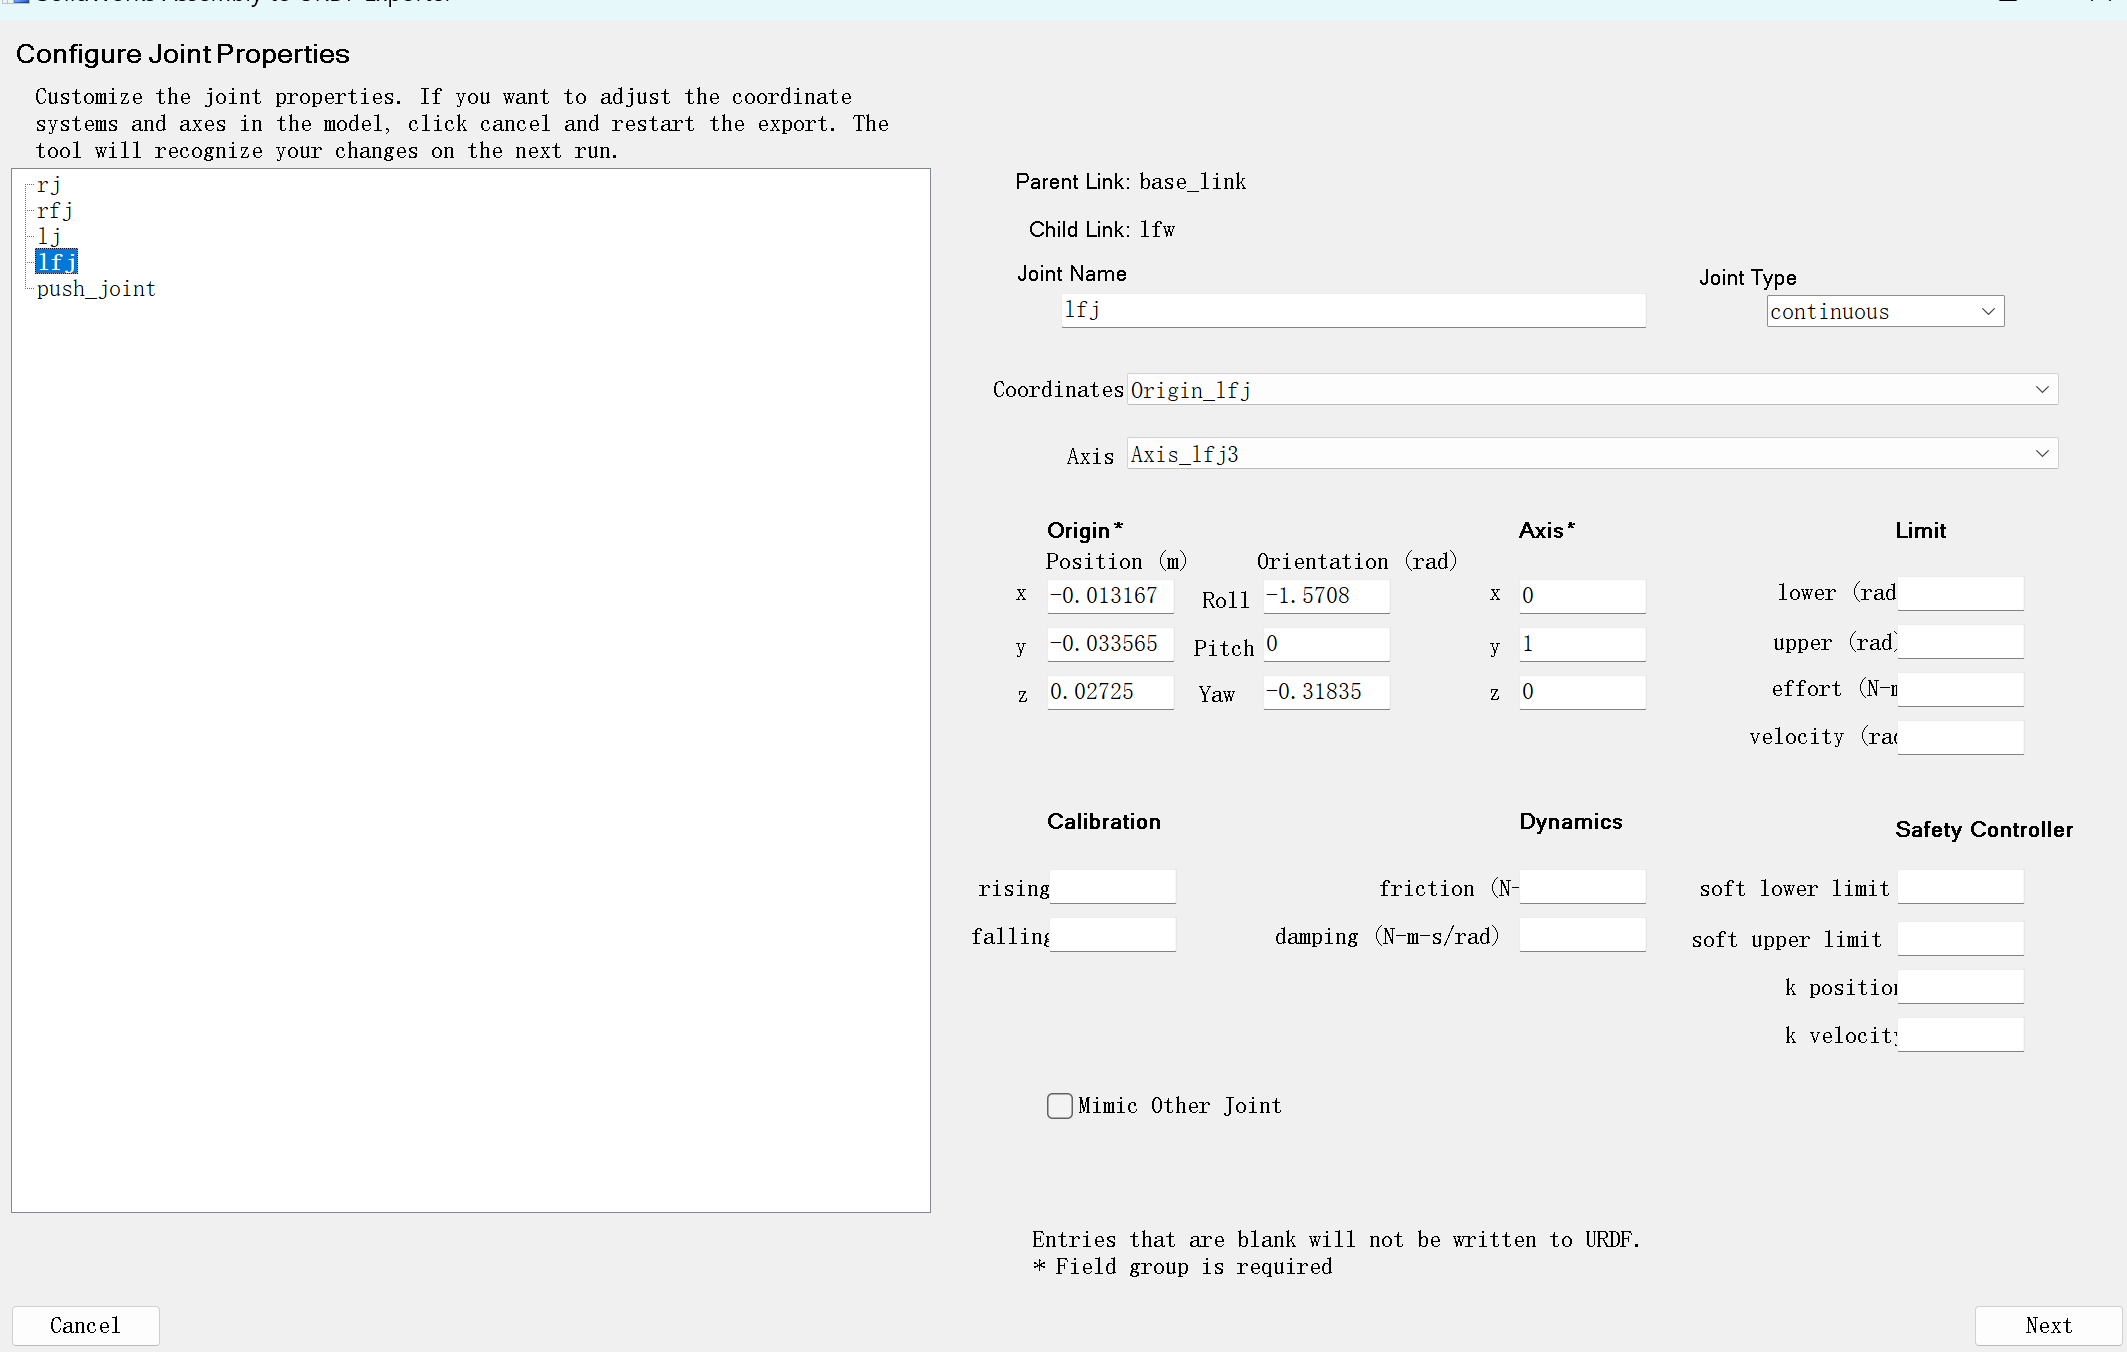
- 下一页配置也是看看有没有缺数据,就可以导出了,建议选择
URDF and meshes
Moveit2 准备与安装
Moveit2 1是 ROS 2 的机器人操作平台,融合了运动规划、操作、3D 感知、运动学、控制和导航方面的最新进展。
准备工作
请先安装好 Ubuntu 系统、ROS2、Gazebo ->详细的文字版教程
安装 Rosdep 以安装系统依赖项
这一步最好需要魔法,Github 不是很稳定,这篇教程提供了国内 gitee 的安装方式。
sudo apt install python3-rosdepsudo rosdep initrosdep updatesudo apt updatesudo apt dist-upgrade另外,不同于 ROS1 我们习惯使用的 catkin_make 编译。Colcon 会成为我们 ROS2 使用新的编译工具。记得安装:
sudo apt-get install python3-colcon-common-extensions安装 Moveit2
这里官方教程是直接把 Moveit2 仓库都搬过去了(实际上不需要,而且很费时间),我们直接二进制安装,方便又快捷!
sudo apt install ros-humble-moveit安装 moveit-setup-assistant
sudo apt install ros-humble-moveit-setup-assistantsudo apt install ros-humble-moveit-*下面一条是顺便安装的。
使用 Moveit2 控制小车机械臂
创建 ROS2 工作空间
mkdir -p carbot_ws/srccd carbot_ws/srcros2 pkg create carbot_description --build-type ament_python把你的 URDF 文件夹和 meshes 文件夹粘贴进去。
配置 URDF 文件
先把名字改成英文。
STL 的文件路径需要修改,网上使用file:///$(find carbot_description)可以,我这里不太行,直接用绝对路径file:///home/tky/car_ws/src/panda_description
开始 Moveit2 assistant setup
ros2 launch moveit_setup_assistant setup_assistant.launch.py具体流程可以看我的教程视频或参考官方教程 。在这里我们主要配置从上往下第 1、2、3、4、5、8、9、10、13、14 项。其中第13项这个邮箱可以乱填,但不能没有,后续会报错。
第 14 项导出时要和 panda_description 同一级目录,两个包并列,假设你给这个放 Moveit2 文件的包文件夹取名config。
运行 Moveit2
ros2 launch config demo.launch.py接下来就可以根据我们的想法,用可视化界面去操作小车的手臂了。plan是规划无碰撞让各个关节达到指定位置的路径,execute是执行,可视化过程。
从 URDF 到 Xacro
Xacro 是 XML,也可以用来表示机器人,与 URDF 很像,但比它有更好的扩展性。
我必须说下面不是一种正规的获得 xacro 文件的方式,但没有关系。
- 首先将文件后缀重命名为
.xacro - 修改开头的(从注释之后开始)
这里的<robot name="car"><robot name="car" xmlns:xacro="http://www.ros.org/wiki/xacro"><xacro:include filename="$(find moveit_resources_panda_description)/urdf/robot.gazebo.xacro" />
moveit_resources_panda_description是我们可以从package.xml中看到的。 - 新建一个文件夹叫
robot.gazebo.xacro - 复制以下代码到
robot.gazebo.xacro,并根据你自己的 joint 和 link 名称进行修改。<?xml version="1.0"?><robot><gazebo reference="base_link"><material>Gazebo/FlatBlack</material></gazebo><gazebo reference="lfw"><mu1>1000000</mu1><mu2>1000000</mu2><kp>500000.0</kp><kd>10.0</kd><minDepth>0.001</minDepth><maxVel>1.0</maxVel><fdir1>1 0 0</fdir1><material>Gazebo/DarkGrey</material></gazebo><gazebo reference="rfw"><mu1>1000000</mu1><mu2>1000000</mu2><kp>500000.0</kp><kd>10.0</kd><minDepth>0.001</minDepth><maxVel>1.0</maxVel><fdir1>1 0 0</fdir1><material>Gazebo/DarkGrey</material></gazebo><gazebo reference="lbw"><mu1>0.5</mu1><mu2>0.5</mu2><kp>500000.0</kp><kd>100.0</kd><minDepth>0.001</minDepth><maxVel>1.0</maxVel><material>Gazebo/DarkGrey</material></gazebo><gazebo reference="rbw"><mu1>0.5</mu1><mu2>0.5</mu2><kp>500000.0</kp><kd>100.0</kd><minDepth>0.001</minDepth><maxVel>1.0</maxVel><material>Gazebo/DarkGrey</material></gazebo><gazebo><plugin name="mybot_controller" filename="libgazebo_ros_diff_drive.so"><odometry_frame>odom</odometry_frame><publish_odom>true</publish_odom><publish_odom_tf>true</publish_odom_tf><publish_wheel_tf>true</publish_wheel_tf><robot_base_frame>base_link</robot_base_frame><num_wheel_pairs>2</num_wheel_pairs><left_joint>lj</left_joint><right_joint>rj</right_joint><left_joint>lfj</left_joint><right_joint>rfj</right_joint><wheel_separation>0.5</wheel_separation><wheel_separation>0.5</wheel_separation><wheel_diameter>0.12</wheel_diameter><wheel_diameter>0.12</wheel_diameter><max_wheel_torque>100000</max_wheel_torque></plugin></gazebo></robot>
在 ROS1 的版本中提供了另外skid_steer包的操控方法。这里 ROS1 和 ROS2 虽然使用插件名称相同,但 XML 编写存在一定差异。
在 Gazebo 仿真环境中开小车
Gazebo 是 ROS2 自带的仿真环境,我们可以用它来模拟小车的运动。
安装 Gazebo 和 teleop_twist_keyboard
sudo apt install gazebosudo apt install ros-humble-gazebo-*sudo apt install ros-humble-teleop-twist-keyboard撰写启动 Gazebo 的.launch.py 文件
原定计划是将同时运行 Gazebo 和 Moveit2 中配置的小车关节控制的节点,这样可以在仿真中开小车的同时还能控制机器臂。但是我不清楚是我的环境还是什么地方出现了问题,导致采用鱼香ROS大佬的代码,Gazebo开不起来,官方的代码也有问题。我将节点发布的那行注释掉了,拿来开小车肯定没有问题。
在panda_description文件夹下创建文件夹launch,新建文件名称为gazebo_model.launch.py,具体代码的解释见视频,直接复制粘贴下面代码肯定是用不了的,有好几处需要自行修改。
import osfrom ament_index_python.packages import get_package_share_directoryfrom launch import LaunchDescriptionfrom launch.actions import ExecuteProcess, IncludeLaunchDescriptionfrom launch.actions import TimerActionfrom launch.launch_description_sources import PythonLaunchDescriptionSourcefrom launch_ros.substitutions import FindPackageShare
from launch_ros.actions import Nodeimport xacro
def generate_launch_description():    # this name has to match the robot name in the Xacro file    robotXacroName='car'    # this is the name of our package, at the same time this is the name of the    # folder that will be used to define the paths    namePackage = 'moveit_resources_panda_description'    # this is a relative path to the xacro file defining the model    modelFileRelativePath = 'urdf/car.xacro'    # this is a relative path to the Gazebo world file    worldFileRelativePath = 'world/arena4.world'    # this is the absolute path to the model    pathModelFile = os.path.join(get_package_share_directory(namePackage),modelFileRelativePath)    # this is the absolute path to the world model    pathWorldFile = os.path.join(get_package_share_directory(namePackage),worldFileRelativePath)    # get the robot description from the xacro model file    robotDescription = xacro.process_file(pathModelFile).toxml()    # this is the launch file from the gazebo_ros package    gazebo_rosPackageLaunch=PythonLaunchDescriptionSource(os.path.join(get_package_share_directory('gazebo_ros'),'launch', 'gazebo.launch.py'))    # this is the launch description    gazeboLaunch=IncludeLaunchDescription(gazebo_rosPackageLaunch,launch_arguments={'world': pathWorldFile}.items())    # here, we create a gazebo_ros Node    spawnModelNode = Node(package='gazebo_ros', executable='spawn_entity.py',    arguments=['-topic', 'robot_description', '-entity', robotXacroName],output='screen')
    # Robot State Publisher Node    nodeRobotStatePublisher = Node(        package='robot_state_publisher',        executable='robot_state_publisher',        output='screen',        parameters=[{'robot_description': robotDescription,        'use_sim_time': True}]    )    # Load controllers using ros2 control spawn, but delay their activation    load_joint_state_broadcaster = TimerAction(        period=5.0,  # Delay in seconds        actions=[            ExecuteProcess(                cmd=['ros2', 'control', 'load_controller', '--set-state', 'active', 'joint_state_broadcaster'],                output='screen'            )        ]    )
    load_arm_controller = TimerAction(        period=7.0,  # Delay in seconds, ensure this happens after joint_state_broadcaster        actions=[            ExecuteProcess(                cmd=['ros2', 'control', 'load_controller', '--set-state', 'active', 'paaa_controller'],                output='screen'            )        ]    )
    # Launch MoveIt 2 (robot_state_publisher + move_group + RViz)    move_group_launch = IncludeLaunchDescription(        PythonLaunchDescriptionSource([            FindPackageShare('config'), '/launch/move_group.launch.py']),  # Replace with actual MoveIt package name    )
    # Launch RViz with MoveIt 2 configuration    rviz_config_file = FindPackageShare('config')\        .find('config') + '/config/moveit.rviz'  # Replace with actual path
    rviz = Node(        package='rviz2',        executable='rviz2',        name='rviz2',        output='screen',        arguments=['-d', rviz_config_file]    )
    # here we create an empty launch description object    launchDescriptionObject = LaunchDescription()    # we add gazeboLaunch    launchDescriptionObject.add_action(gazeboLaunch)
    # we add the two nodes    launchDescriptionObject.add_action(spawnModelNode)    launchDescriptionObject.add_action(nodeRobotStatePublisher)    launchDescriptionObject.add_action(load_joint_state_broadcaster)    # launchDescriptionObject.add_action(load_arm_controller)    launchDescriptionObject.add_action(rviz)    launchDescriptionObject.add_action(move_group_launch)    return launchDescriptionObject
然后你需要在 Cmakelist 当中的 include 添加 launch 文件夹,形式如下:
install(DIRECTORY meshes urdf launch DESTINATION share/${PROJECT_NAME})如果你希望尝试我失败的 Rviz 控制 Gazebo 环境下的小车,你需要对car.xacro和package.xml修改,具体见文章最后的代码仓库。
让我们开始开小车吧!
ros2 launch moveit_resources_panda_description gazebo_model.launch.py然后打开一个新的终端,输入:
ros2 run teleop_twist_keyboard teleop_twist_keyboard按下键盘上的方向键,小车就会开始运动。
参考
-
由于 ROS1 最后一个版本到2025年停止维护,因此原定基于 ROS1 的教程决定更改为基于 ROS2 ,同样使用的 Moveit 须改为 Moveit2 。 ↩